
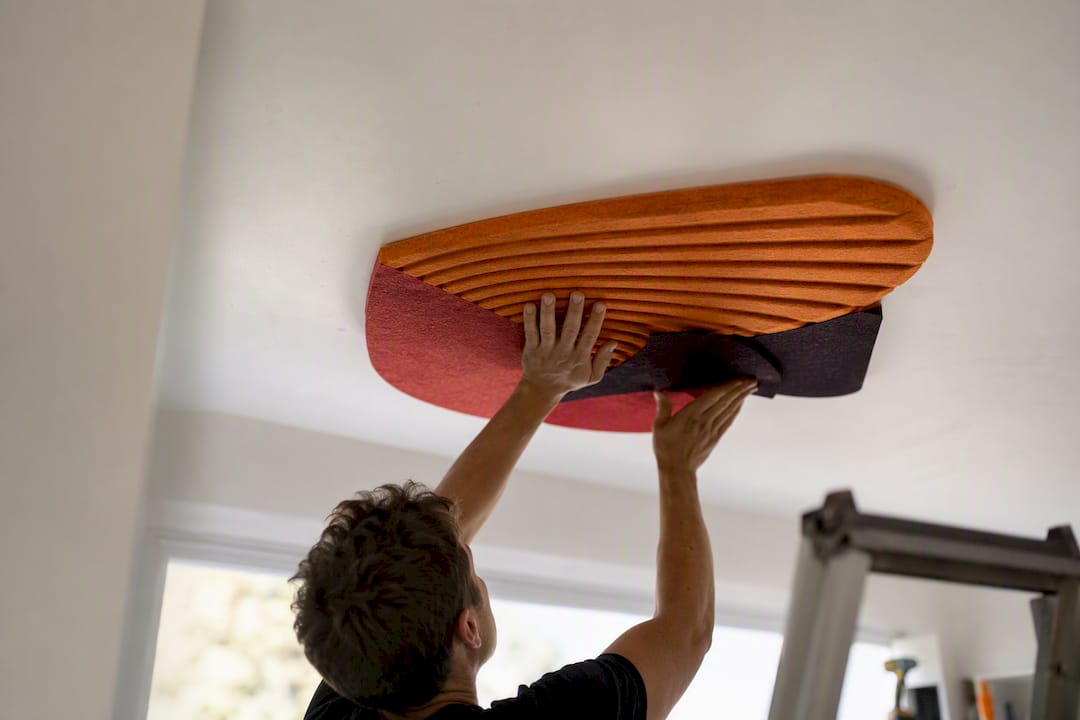
Yes, lightweight PET felt feature panels can go on a ceiling, provided the surface is smooth and sound and you use adhesives rated for the panel’s weight. No, they are not right for textured “popcorn” ceilings, damp bathrooms, or plaster that is already flaking. This is a decorative upgrade, not a soundproofing product, and it works best as a considered feature rather than a full ceiling cover.
Before you climb a ladder, a few things matter more than colour choice:
- Test the adhesive on a hidden patch first, always.
- Get a second person to help with placement and holding.
- Check your lease for any clause about ceiling fixtures.
DwellForms™ by Lifted+ was designed around exactly this brief: colour without commitment, using tested adhesive pads instead of drills, screws or glue that fights back when you move out.
Key Takeaways
Felt ceiling panels work best as a design-first, no-drill feature on smooth, tested surfaces, not as an acoustic or structural ceiling treatment.
| Point | Details |
|---|---|
| Surface test first | Run a 48 to 72 hour adhesive patch test before committing to a full ceiling layout. |
| Match adhesive to weight | Choose pads or strips rated for your specific panel weight, distributed towards the corners. |
| Treat acoustic benefit as secondary | Felt softens echo modestly but does not replace purpose-built acoustic ceiling systems. |
| Keep clearance from fixtures | Leave at least 30 centimetres around smoke alarms, vents and light fittings. |
| Choose DwellForms™ for modular growth | DwellForms™ kits use recycled PET felt and tested adhesive pads, letting renters start small and expand with extension packs. |
Table of Contents
- Quick checklist: is your ceiling right for felt panels?
- How to install PET felt panels on a ceiling without drilling
- Ceiling design ideas and layout tips that work for renters
- How to test surfaces and get landlord buy-in without risking your bond
- How to care for ceiling panels and remove them safely later
- Do felt ceiling panels actually reduce noise?
- Is it safe to put felt panels on a ceiling, fire wise?
- What tools do you actually need, and can you skip drilling entirely?
- How sustainable are felt ceiling panels, really?
- What the research actually supports about ceiling feature panels
- Try DwellForms™ before you commit to a full ceiling feature
- Sources
- FAQ
Quick checklist: is your ceiling right for felt panels?
Run through this before you order anything. It saves you a wasted afternoon and, more importantly, saves your bond.
- Surface type. Smooth, painted plasterboard and finished timber ceilings hold adhesive well. Textured or “popcorn” finishes, freshly painted surfaces (under six weeks old), and loose or flaking plaster are all poor candidates. PET felt is dimensionally stable and suited to decorative wall and ceiling modules when fixed correctly, but stability starts with the substrate, not the panel.
- Weight versus adhesive rating. Every panel has a weight, and every adhesive pad has a load limit. Removable mounting strips list specific per-strip weight capacities for exactly this reason. Match the two before you commit to a layout.
- Height and access. A standard 2.4 metre ceiling is manageable with a sturdy step ladder and a second pair of hands. Anything higher needs proper scaffolding, not a kitchen chair.
- Lease conditions. Photograph the ceiling’s current state and check your tenancy agreement for any restriction on fixtures, even removable ones.
Pro Tip: Photograph your ceiling in natural daylight before you start. If a landlord ever questions a mark, you’ve got dated proof of the original condition.
How to install PET felt panels on a ceiling without drilling
Treat this as a measured project, not a rush job. Ceilings are less forgiving than walls because you’re working against gravity the whole time.
What you’ll need:
- Removable adhesive pads or picture hanging strips rated to panel weight
- A step ladder and a helper
- A microfibre cloth and mild cleaner (no oils or waxes)
- A tape measure, pencil, and a spirit level or laser line
Step-by-step:
- Clean the ceiling surface thoroughly and let it dry completely. Dust and grease stop adhesives bonding properly.
- Mark your layout in pencil, working from the centre of your intended feature outward, so any pattern stays symmetrical.
- Choose your adhesive. Damage-free hanging strips hold strongly on smooth indoor surfaces and remove cleanly when used as directed, but always check the specific load rating against your panel’s weight, not a general estimate.
- Test one panel first. Press it into place, hold firmly for the manufacturer’s specified time, then leave it overnight before hanging the rest.
- For the remaining panels, apply pads towards the corners rather than a single central pad. Distributing adhesive points this way reduces peel force on the paint finish and gives you redundancy if one pad ever slips.
- Press each edge individually, working from the centre of the panel outward, and hold each corner for the full recommended time before letting go.
If a strip does slip, don’t just push it back and hope. Remove it, clean off any residue, and apply a fresh strip rather than layering a new one over the old. If a panel feels marginal on weight, add more adhesive pads as needed rather than relying on a single pad’s rated capacity. And always do a final visual check a day later, not just straight after installation, since some adhesives reach full strength gradually.
Ceiling design ideas and layout tips that work for renters
A ceiling feature reads differently to a wall feature, because you’re usually seeing it from below and at an angle, not head on. That changes how scale and colour behave.
- Clustered arrangement: A tight grouping of six to nine panels above a bed or dining table reads as a single sculptural moment rather than scattered decoration.
- Linear runs: A single row of panels down a hallway ceiling draws the eye forward and works well in narrow spaces where wall space is limited.
- Framed ceiling rugs: A rectangular block of panels, bordered slightly by ceiling paint, mimics the effect of a rug for the eye, anchoring a seating area below.
- Offset grids: Panels staggered rather than perfectly aligned feel more organic and hide minor measuring imperfections.
As a rough guide, a 3 metre by 3 metre bedroom ceiling suits a feature of nine to twelve panels rather than a full cover, leaving painted ceiling as breathing room around the edges. Keep at least 30 centimetres of clearance from smoke alarms, vents and light fittings; a striking ceiling is never worth compromising a safety device. If you’re not sure how a colour will read under your room’s light, order a sample kit and hold swatches up before buying a full set. Darker tones are worth placing away from doorways and high-touch corners, where scuffing shows fastest. Because DwellForms™ kits are modular by design, you can start small and add an extension pack later without redesigning what’s already up.
How to test surfaces and get landlord buy-in without risking your bond
Before committing to a full layout, run a patch test on an inconspicuous section of ceiling, ideally in a corner that’s rarely seen.
- Apply a single adhesive pad to a small offcut or spare panel corner.
- Leave it in place for 48 to 72 hours, then remove it slowly and check for paint lift, colour change, or sticky residue.
- If the surface is clean, proceed with confidence. If there’s minor residue, switch to a lower-tack strip. If paint lifts at all, avoid ceiling mounting on that surface and consider wall placement instead.
- Photograph the test area before and after, with the date noted, as part of your condition record.
Removable strips explicitly note they’re not designed for textured or porous surfaces, so a failed test on a textured ceiling isn’t a fault with the product, it’s a sign that surface was never a candidate. If a landlord declines permission for ceiling fixtures altogether, a wall-mounted arrangement, a freestanding screen, or panels hung from a shelf unit all deliver similar visual impact without touching the ceiling at all.
Pro Tip: Ask for permission in writing, even a text message, before you install anything. It protects both you and the panels if there’s ever a dispute at inspection.
How to care for ceiling panels and remove them safely later
Felt panels are genuinely low fuss, but a few habits keep them looking sharp for years rather than months.
- Dust with a soft brush attachment on a vacuum every few weeks; felt traps dust more than smooth paint does.
- Spot clean marks with a barely damp cloth. Never soak felt, since it holds moisture and can warp.
- PET felt retains colour well and is dimensionally stable over time, but any material will fade faster under direct, sustained sunlight, so a north-facing skylight run deserves a check every six months.
- When removing, pull each panel slowly and evenly rather than yanking one corner. Use an adhesive remover sparingly only if residue remains, and always test it on a hidden spot first.
- Store spare or removed panels flat, in their original packaging where possible, away from damp areas that could warp the felt.
Do felt ceiling panels actually reduce noise?
Felt has genuine sound absorbing properties, but a handful of decorative panels on a ceiling will not turn a noisy apartment quiet. Self-adhesive PET felt can offer a modest acoustic improvement as a secondary benefit to its decorative role, largely by softening hard reflective surfaces and reducing echo in a room.
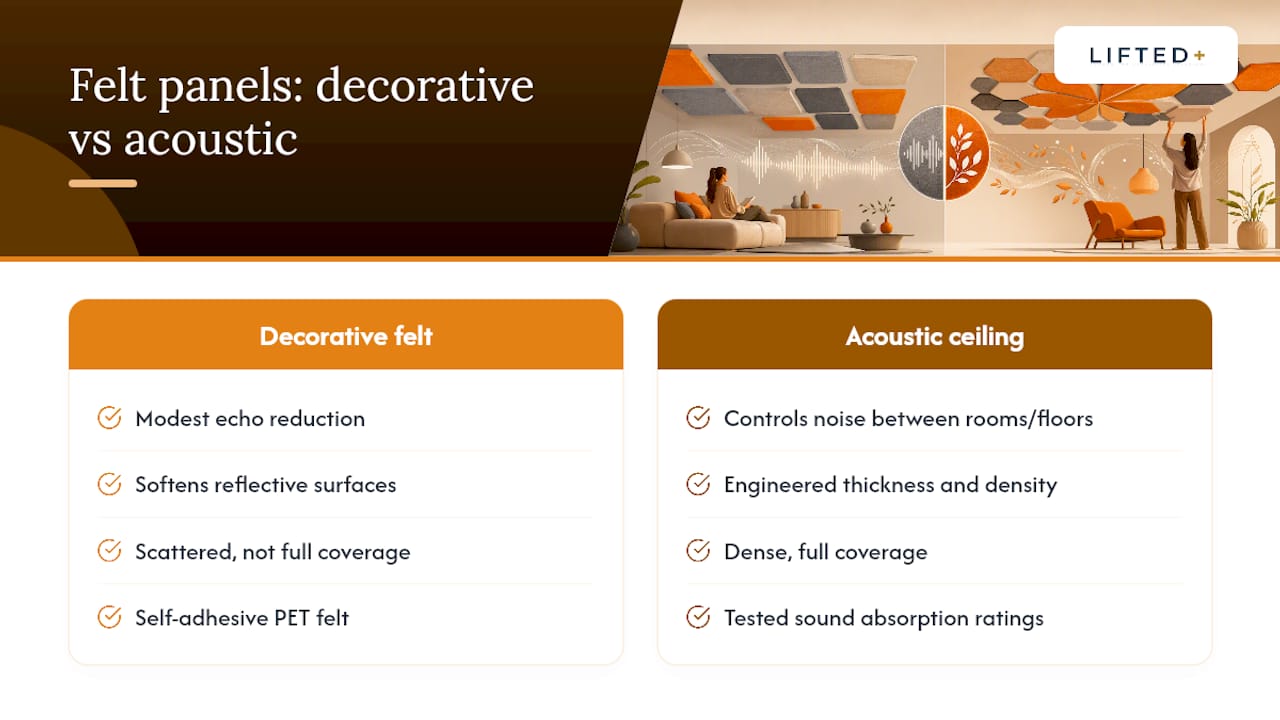
That’s a different job to purpose-built acoustic ceiling systems, which use engineered thickness, dense coverage and tested sound absorption ratings to manage noise transfer between floors or rooms. Architectural guidance on felt panel design notes that felt’s acoustic performance in commercial settings depends on full coverage, panel density and mounting method, none of which apply to a scattered decorative cluster above a bed.
If you notice your room feels a little less “echoey” once panels go up, that’s real, and it’s a welcome side effect. Just don’t buy a DwellForms™ kit expecting it to solve a noisy upstairs neighbour or a shared-wall apartment’s traffic noise. For genuine acoustic treatment, you’re looking at a different category of product entirely, engineered and tested for that specific purpose, not a colour-led feature system. Treat any ceiling softening as a bonus of the decorative upgrade, not the reason you bought it.
Is it safe to put felt panels on a ceiling, fire wise?
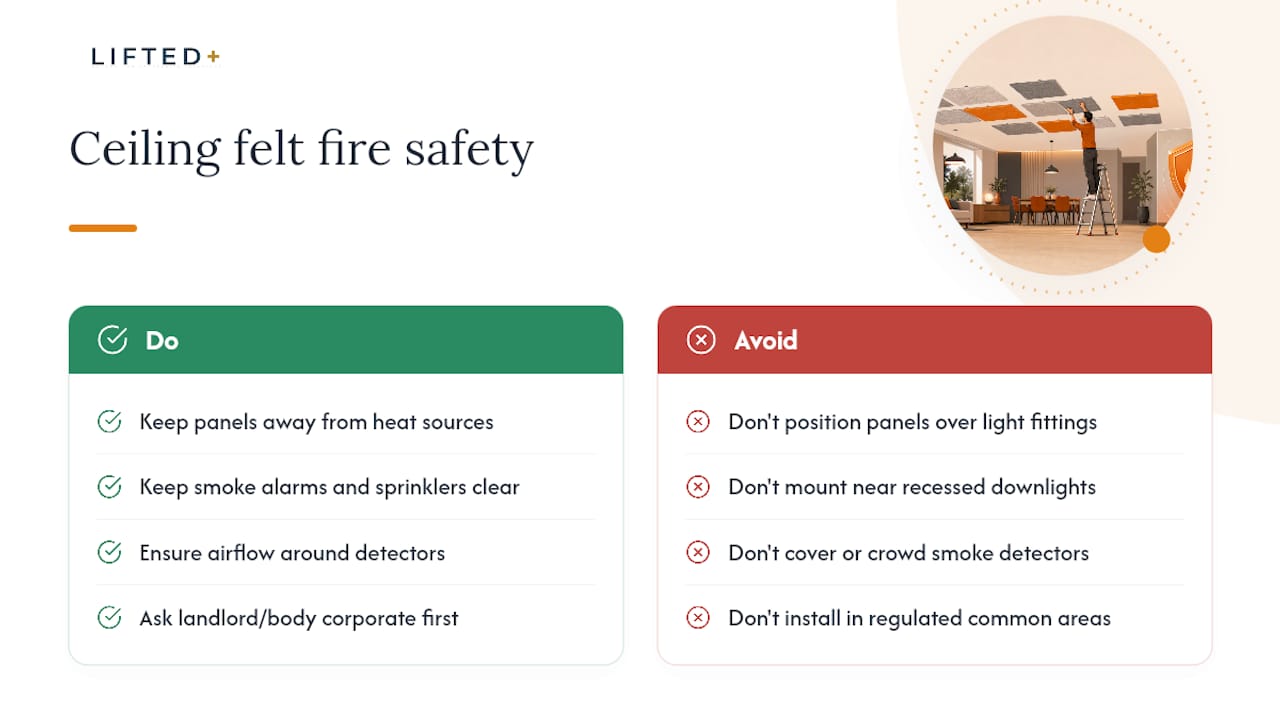
PET felt used in decorative wall and ceiling panels is a manufactured textile product, and any material applied to a ceiling in a rental or owned home should meet basic fire safety expectations for interior lining materials. This matters more on a ceiling than a wall, simply because heat and smoke rise, and ceilings sit closer to smoke detection hardware.
The practical takeaway for a renter or homeowner doing a decorative install isn’t a deep dive into building code classifications, since a handful of panels covering a small portion of ceiling area is a different scenario to a full commercial fitout. It is this: never position panels over or immediately around light fittings that generate heat, recessed downlights, or any fixture with exposed wiring. Keep smoke alarms and sprinkler heads fully clear, not just visually unobstructed but with genuine airflow around them, since covering or crowding a detector can delay its response. If you’re doing a ceiling feature in a larger area, a rental with shared common areas, or anywhere subject to specific building compliance, check with your landlord or body corporate before proceeding, since additions to ceiling surfaces in shared or regulated buildings can fall under different rules to a standalone home. For a typical bedroom or living room feature in a private tenancy, sensible clearance from heat sources and detection devices covers the practical risk.
What tools do you actually need, and can you skip drilling entirely?
You can, and for a rental, you should. Drilling into a ceiling means filling holes later, matching paint, and hoping the landlord doesn’t notice the difference in sheen. None of that is necessary for a felt feature panel designed for adhesive mounting.
The genuine tool list is short: a step ladder, a cleaning cloth, a pencil and tape measure, a spirit level or laser line for straight rows, and the adhesive pads or strips themselves. Removable mounting squares are a useful example of light, mess-free application designed for exactly this kind of job, provided you check the surface and weight suitability first.
Mechanical attachment, screws into joists, wall plugs, batten strips, belongs to a different category of ceiling treatment entirely: permanent, heavier acoustic or structural panel systems intended to stay for the life of the building. That is not what a DwellForms™ ceiling feature is for. If you’re renting, or simply don’t want to commit to permanent changes, mechanical fixing is the wrong tool for this particular job, full stop. The adhesive route exists precisely because it delivers the visual impact without the compromise, and it’s the only method this guide recommends for a felt feature ceiling.
How sustainable are felt ceiling panels, really?
The felt itself matters here as much as the finished look. PET felt is typically made from recycled plastic, most commonly recycled PET bottles, processed into a dense, fibrous textile. That gives it a genuinely different environmental story to virgin plastic panels or new timber battening systems.
DwellForms™ panels are made from 100% recycled materials, which means choosing a ceiling feature in this material diverts plastic waste rather than adding to demand for new resin. The other sustainability angle is less obvious but arguably more relevant for renters: reusability. A panel that can be removed intact and taken to your next home is inherently lower waste than a decorating choice that gets painted over or torn down at lease end. Wallpaper strips off in shreds. Paint gets rolled over. A felt panel comes down clean and goes back up somewhere else.
That reusability is the quieter sustainability win most articles on this topic skip past. It’s not just about what the material is made from, it’s about whether the finished product avoids landfill at your next move, and a genuinely removable, modular system is built around that outcome from the start.
What the research actually supports about ceiling feature panels
Most advice on felt ceilings gets pulled from commercial acoustic panel literature, and it shows. Readers end up comparing sound absorption coefficients when what they actually want to know is whether their bedroom ceiling will look good and come down cleanly when they move. Those are different questions with different answers, and conflating them does renters a disservice.
The conventional wisdom oversells acoustic benefit and undersells the real risk, which is surface compatibility, not sound science. A textured ceiling or fresh paint job will sink a felt panel project long before acoustic performance becomes relevant. Testing the adhesive on a hidden patch, documenting the ceiling’s condition, and matching pad load to panel weight, these unglamorous steps matter more than any colour or pattern decision.
What renters should prioritise first is permission and surface testing, not design. Get that right, and the creative part, colour, scale, placement, becomes genuinely enjoyable rather than anxious. DwellForms™ was built around that order of operations: test, confirm, then style. That sequencing, more than any single product feature, is what separates a ceiling feature that lasts from one that ends in a bond dispute.
— Michelle
Try DwellForms™ before you commit to a full ceiling feature
DwellForms™ is the practical alternative to painting a feature ceiling or hiring someone to fit permanent panelling. Every kit uses tested adhesive pads, rather than drills, screws or construction adhesive, so there’s nothing to patch, sand or repaint when your lease ends or you simply want a change.

That means you can start with a small cluster above a bed and genuinely expand later with an extension pack, rather than committing to a full layout on day one. Each kit ships with installation guidance covering adhesive placement, spacing and patch testing, so you’re not guessing at load ratings on your own.
If you’re still deciding on colour or pattern, order a sample swatch kit first and hold it up under your own ceiling light before buying. Then run the 48 hour patch test described earlier, follow the supplied layout guide, and add panels as your confidence (and your ceiling) allows. Ready to start? Browse the DwellForms™ Skyline Kit and take the first small step toward a ceiling that actually feels like yours.
Sources
For deeper material background and layout guidance, these pages informed this article:
- Command™ Picture Hanging Essentials Kit, 24 pieces | 3M United States
- FrogTape reMOVEables™ Medium Picture Hanging Strips
FAQ
Can you put felt panels directly on a ceiling?
Yes, on smooth, painted plasterboard or finished timber ceilings, using adhesive pads rated to the panel’s weight. Textured, damp or freshly painted ceilings are not suitable candidates.
Do felt panels fade over time?
PET felt retains colour well under normal indoor light, but sustained direct sunlight can fade any coloured material faster, so check sunny spots every few months.
Will felt ceiling panels soundproof a room?
No. They can modestly soften echo, but they are a decorative product, not a substitute for engineered acoustic ceiling systems designed for noise control.
How do you remove felt panels from a ceiling without damage?
Pull each panel slowly and evenly from one corner, then remove any adhesive residue gently. A properly tested surface should release cleanly with no paint lift.
Can renters use ceiling felt panels without losing their bond?
Yes, provided you patch test the adhesive first, document the ceiling’s condition with photos, and get written permission where your lease requires it. DwellForms™ is built around exactly this no-drill, removable approach for renters.