
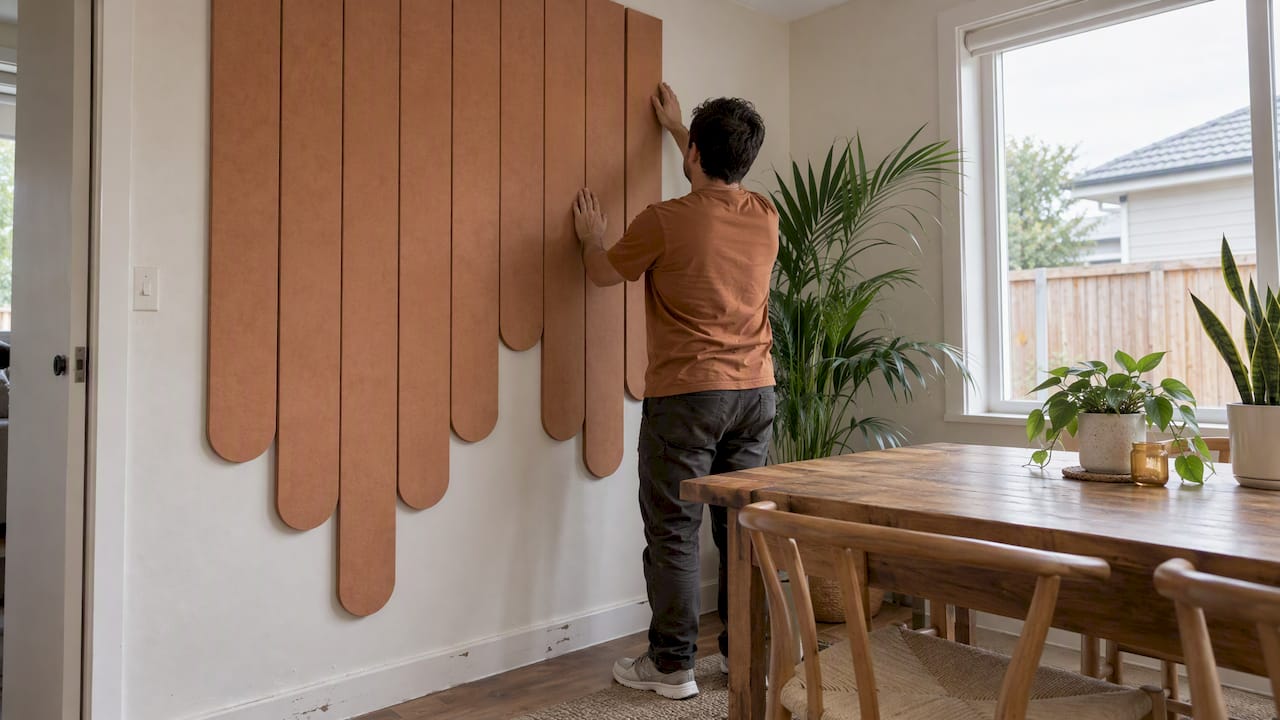
Yes, removable, no-drill PET felt panel kits such as DwellForms™ let you add colour to a rental wall without risking your bond, provided you follow a few careful steps first. The real exposure comes from adhesive and paint interactions, not the panels themselves, so testing a discreet patch and keeping dated photos matters more than the product you choose. Read on for the checklist that keeps a feature wall from becoming a dispute.
TL;DR:
- Testing adhesive products on a hidden wall patch and documenting the process minimizes the risk of paint damage during removal.
- Landlords must respond in writing within 21 days to any request for a minor change, but no formal consent is needed for no-drill PET felt panels.
- Even trusted brands can damage paint if panels are left in place too long, in humid conditions, or applied to unprimed paint, so proper testing is essential.
- Photographs from move-in baseline inspections and careful prep help tenants contest unreasonable bond claims for wall damage.
- Removable panels are designed to be moved and reused, but proper removal techniques and original packaging are key to avoiding damage and simplifying relocation.
Table of Contents
- What New Zealand tenancy law says about minor changes
- Why ‘removable’ adhesives can still mark the paint
- Before you stick anything up: a pre-installation checklist
- Installing and removing PET felt panels the right way
- Lower-risk alternatives if you want zero adhesive on the walls
- DwellForms™: what makes it renter-friendly in New Zealand
- How a landlord actually claims bond for wall damage
- How the Tenancy Tribunal weighs a wall damage dispute
- Fixing wall marks before your final inspection
- What counts as damage versus fair wear and tear
- Common ways tenants accidentally damage rental walls
- Your rights and responsibilities around rental wall damage
- Author perspective: make colour without risking the bond
- Where to start: core kits, samples and extension packs
- FAQ
- Sources
What New Zealand tenancy law says about minor changes
Under the Tenancy Services guidance on tenants making changes, a tenant who wants to make a minor change to a rental, like hanging picture hooks or attaching light fittings, can ask the landlord in writing, and the landlord must respond in writing within 21 days. A landlord cannot unreasonably withhold consent for a genuine minor change under section 42B of the Residential Tenancies Act.
That 21-day window gives you a clear, lawful path rather than a guessing game. A few points worth holding onto before you pick up any adhesive strip:
- Put the request in writing, even if it is a short email, so there is a record of what you asked and when.
- Expect a written answer within 21 days: silence does not count as approval.
- Plan to return the property to substantially the same condition at the end of the tenancy, unless you and the landlord agree otherwise in writing.
Most no-drill décor, including PET felt panel kits, sits outside the formal consent process altogether because nothing is fixed to the structure. Still, understanding the section 42B process means you are never caught off guard if a landlord asks what you have added to the walls.
Why ‘removable’ adhesives can still mark the paint
Removable does not always mean risk-free. A reported Tenancy Tribunal decision found that paint had lifted after a tenant used well-known picture hanging strips, and the tenant was held liable for repainting costs because the damage went beyond fair wear and tear.
A documented Tenancy Tribunal case shows that even branded, widely trusted picture strips can pull paint off a wall when removed. The decision is a useful reminder that brand reputation alone is not a guarantee.
A few conditions raise the odds of trouble: fresh or low-quality paint that has not fully cured, high humidity that softens adhesive bonds, and panels left in place for many months before removal. None of this means you should avoid adhesive décor. It means you test first, read the manufacturer’s removal steps properly, and never assume a product is immune to the wall it is stuck to.
Before you stick anything up: a pre-installation checklist
A little preparation now saves a conversation with your landlord later. Work through these steps before any panel touches the wall:
- Photograph every wall on day one. Date-stamped photos from move-in are your baseline evidence if a dispute ever arises.
- Keep your entry inspection report. File it somewhere you can find it in a year, not just in your inbox.
- Test a discreet patch first. Apply a single pad to a hidden section of wall, such as behind a door, and leave it for a day before judging the bond.
- Note your paint type and the room’s humidity. Bathrooms, laundries and older villas with chalky paint carry more risk than a freshly painted apartment.
- Put a written request to your landlord when you are doing anything beyond a small no-drill kit, referencing section 42B and including a photo of the intended layout.
- Keep all packaging, instructions and adhesive pads from the kit itself. You will need them again at removal time.
Pro Tip: Photograph the test patch alongside a day’s newspaper or your phone’s date display, so the image timestamps itself if you ever need to show when the test happened.
A move-in inspection checklist is a handy companion here if you want a structured format for recording wall condition before you start decorating.
Installing and removing PET felt panels the right way
Our kits use adhesive pads rather than screws, nails or construction adhesive, which contributes to making them a renter-friendly feature wall option. The technique still matters, though.
- Clean the wall surface thoroughly before applying any pad. Dust and oils weaken adhesion and can cause a panel to peel unevenly later.
- Start with a small layout rather than covering an entire wall on your first attempt. It lets you judge how the adhesive behaves on your specific paint before committing further.
- Respect the weight rating of each adhesive pad. Overloading a pad with too many panels or additional hooks increases the chance of a forced, rough removal.
- When it is time to take the panels down, use the removal tab or gentle heat technique the manufacturer recommends, working slowly rather than pulling in one motion.
Pro Tip: Warm the pad slightly with a hairdryer on a low setting before lifting the tab, since gentle heat softens the adhesive and reduces the chance of pulling paint with it.
If paint does lift during removal despite following every step, stop immediately, photograph the area, and tell your landlord what happened. Most tenancies can resolve a small patch of paint loss with a straightforward offer to repair or a conversation about shared cost, especially when you can show you tested properly and followed the instructions. Our guide to removing adhesive wall panels without wrecking the wall walks through the full technique in more detail, and our removable wall panel ideas for NZ renters page is a good place to plan a layout before you buy.
Lower-risk alternatives if you want zero adhesive on the walls
Not every renter wants anything touching the paint, and that is a reasonable position. A few options sit even further from any bond risk:
- Freestanding art and leaning pieces. A large framed print leant against the wall or resting on a shelf adds presence without touching the surface at all.
- Picture ledges and existing rails. Many older NZ rentals still have picture rails near the ceiling, a useful leftover from a different era of wall decoration.
- Textiles and rugs. A patterned rug, a woven wall hanging draped over a rod, or a bold throw adds colour and texture without any adhesive.
- Curtain tracks and well-rated command hooks, used strictly within their stated weight limits, for lightweight items only.
For anything heavier, or if a previous attempt has already left a mark, it is worth asking a painter to assess the wall before your final inspection rather than leaving it for the landlord to flag.
DwellForms™: what makes it renter-friendly in New Zealand
The modular kits let you build a sculptural, colourful feature wall and then take it apart, rearrange it, or move it to a new flat entirely, which suits the realities of renting in New Zealand’s cities.
Colour samples let you test both the shade and the adhesive compatibility on your actual wall before committing to a full kit. Kits come in core and extension options so you can start small and build out once you are confident in how the panels behave on your paint.
We are upfront that no adhesive product can promise guaranteed damage-free use on every wall. Paint age, surface prep and humidity all play a part, which is exactly why the testing and documentation habits in this guide matter alongside the product itself.
How a landlord actually claims bond for wall damage
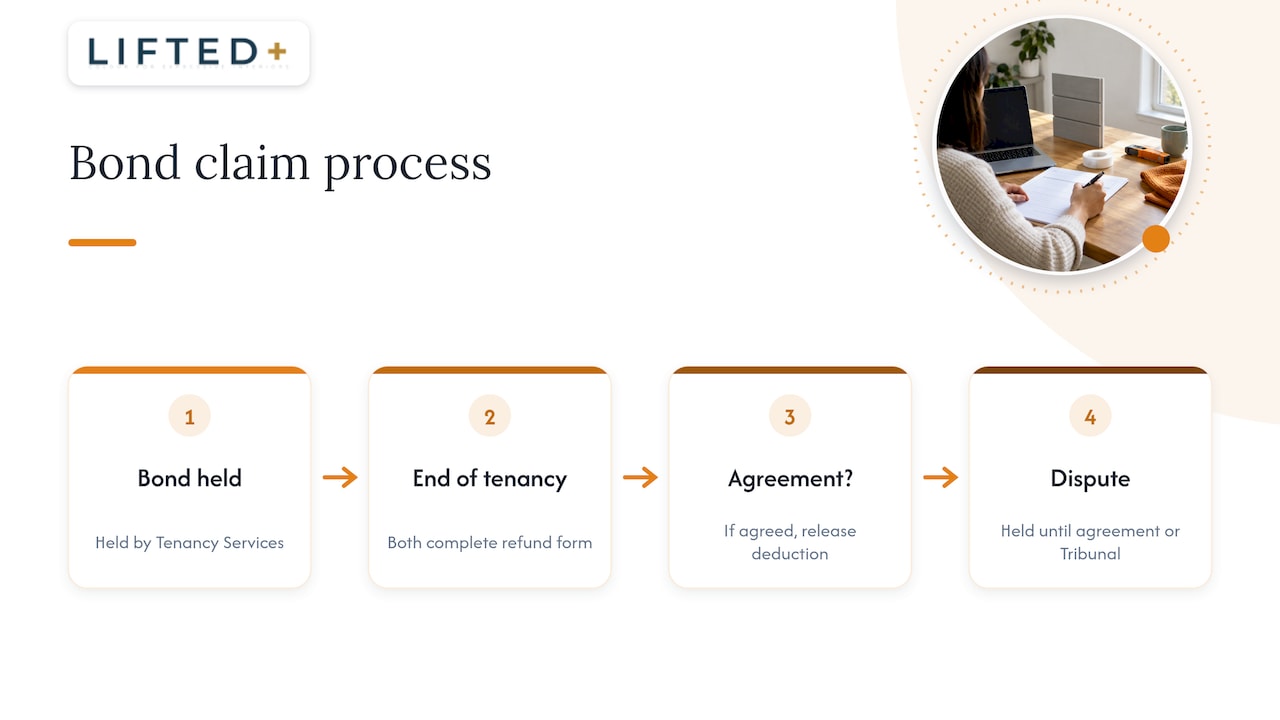
A landlord cannot simply deduct money from your bond without process. Under New Zealand’s bond system, the bond is held by Tenancy Services, not the landlord, and any claim against it at the end of a tenancy needs your agreement or a Tenancy Tribunal order.
When a tenancy ends, both parties fill out a bond refund form. If the landlord believes there is damage beyond fair wear and tear, they list the amount they want withheld and the reason. If you disagree, you simply do not sign off on that portion, and the disputed amount stays with Tenancy Services until it is resolved.
A landlord who wants to recover repainting or repair costs typically needs to show the damage exceeds normal wear and tear, and ideally provide a quote or invoice for the repair. If you have day-one photos and evidence that you tested adhesives and followed removal instructions, you are in a far stronger position to contest an unreasonable claim. Unresolved disputes go to the Tenancy Tribunal, which is the only body with authority to order money released against your wishes.
How the Tenancy Tribunal weighs a wall damage dispute
The Tenancy Tribunal does not take a landlord’s word for it. It looks at evidence from both sides: photographs, inspection reports, repair quotes and any written correspondence about consent or complaints raised during the tenancy.
A central question in any wall damage case is whether the marks are damage or fair wear and tear. Scuffs from normal living, faded paint from sunlight, or minor marks that accumulate over a long tenancy are generally treated as wear and tear, which a landlord cannot charge for. Genuine damage, such as the paint loss described in the picture strips decision, is assessed against what a reasonable, careful tenant would have avoided.
The length of the tenancy matters too. A mark that might count as damage in a six-month tenancy is more likely to be treated as expected wear after several years in the same home. The Tribunal also considers whether the tenant acted reasonably, including whether they tested a product first, followed manufacturer instructions, and told the landlord promptly if something went wrong. Tenants who can produce dated photos and a record of their precautions tend to fare considerably better than those who cannot.
Fixing wall marks before your final inspection
The best time to deal with a mark on the wall is well before the final inspection, not on moving day. If a small amount of paint has lifted from an adhesive pad, a touch-up with matching paint, applied carefully to the affected patch, is often enough to satisfy a landlord that the wall has been returned to a reasonable condition.
Keep a few habits in mind as you prepare to move out:
- Walk through every room against your original day-one photos and note any changes honestly.
- Address small marks yourself with appropriate filler or touch-up paint rather than waiting for the landlord to raise it.
- Request a pre-move-out inspection so any concerns surface while you still have time to fix them.
- If a mark is beyond a simple touch-up, get a written quote from a painter and offer to cover the cost directly rather than leaving it to a bond dispute.
This approach, raised in practical tenant guidance on personalising a rental, consistently comes back to the same idea: document everything, act early, and be the one who raises the issue first.
What counts as damage versus fair wear and tear
New Zealand’s tenancy framework draws a firm line between damage a tenant must pay for and wear and tear a landlord must simply accept as the cost of renting out a property. Fair wear and tear covers the gradual, unavoidable decline that comes from ordinary living: faded paint, minor scuffing near light switches, or carpet flattened by years of foot traffic.
Damage, by contrast, is harm beyond what reasonable use would cause, whether through carelessness, an accident or a tenant’s deliberate action. Large holes, cracked plaster, or paint stripped away by an adhesive product used against the manufacturer’s instructions generally fall on the tenant’s side of that line.
The distinction is not always obvious at a glance, which is exactly why the Tenancy Tribunal weighs context such as the length of the tenancy and whether the tenant took reasonable precautions. A single peeled patch from a tested, carefully removed panel reads very differently to an inspector than a wall covered in unremoved adhesive residue and gouges. Keeping that distinction in mind while decorating, and leaning towards the gentler, tested methods described earlier, keeps most wall décor comfortably on the wear and tear side of the line.
Common ways tenants accidentally damage rental walls
Most wall damage disputes in New Zealand rentals trace back to a handful of repeat causes, and recognising them is the first step to avoiding them.
- Nail and screw holes from hanging art or shelving without consent, especially multiple holes from repositioning.
- Paint pulled off by adhesive products that were left too long, applied to unprimed surfaces, or removed too quickly.
- Blu Tack or putty residue left behind on paint, which can discolour or stain the surface over time.
- Scuffs and gouges from furniture moved without protective pads underneath.
- Moisture marks from poorly ventilated bathrooms or unflued heaters, which can affect paint and plaster over a tenancy.
Almost all of these share a common thread: they come from fixtures or forces the wall was never designed to handle long-term. A no-drill, tested-adhesive approach sidesteps the first and third items on that list entirely, which is a meaningful part of why removable PET felt panels have become popular among renters who still want a personal, colourful home.
Your rights and responsibilities around rental wall damage
As a tenant, you have a right to request minor changes to the property under section 42B, and a right to a fair, evidence-based assessment of any damage claim rather than an automatic deduction. You also have the right to dispute a bond claim through the Tenancy Tribunal if you believe it is unreasonable.
Alongside those rights sit clear responsibilities. You are expected to use the property in a reasonable way, report any damage to the landlord as it happens rather than hiding it, and return the home at the end of the tenancy in substantially the same condition it was in when you moved in, fair wear and tear aside. The Tenancy Services guidance is the clearest starting point if you are ever unsure where a specific change sits.
Balancing those rights and duties is really a matter of good habits: ask before you are not sure, document before you start, and act quickly if something goes wrong. None of that stops you from making a rental feel like your own home. It just means the colour and character you add stay yours to enjoy, rather than becoming a line item at the final inspection.
Author perspective: make colour without risking the bond
We think the tension between wanting a home that feels like yours and fearing a bond deduction is one of the quieter stresses of renting in New Zealand. Our honest advice is to start with a colour sample, keep every photo and receipt, and treat the DwellForms™ installation and removal pages as required reading, not an afterthought. A little documentation buys a lot of creative freedom.
— Michelle
Where to start: core kits, samples and extension packs
If you are ready to try a no-drill feature wall, the lowest-risk way in is a DwellForms™ Colour Sample. It lets you test both the shade and how the adhesive behaves on your actual wall before you commit to anything larger.

Once you are confident, a DwellForms™ Core Kit gives you the foundation for a full feature wall, and an Extension Kit lets you grow the layout once you know how the panels sit. Keep every box, instruction sheet and spare adhesive pad. You will want them again, both for touch-ups and for the day you move house and take the whole wall with you.
FAQ
Will removable wall panels affect my bond in NZ?
Removable PET felt panels like DwellForms™ are generally low risk for your bond when you test the adhesive first and follow the removal instructions, because they do not involve drilling, screws or paint. Some risk remains if paint is old, humid conditions weaken the bond, or panels are left up for a very long time, as shown in a reported Tenancy Tribunal decision involving picture strips.
Do I need landlord consent for no-drill wall décor?
For genuinely no-drill, adhesive-pad products that leave the wall structure untouched, formal written consent is not usually required. If you are planning a larger change or anything that affixes to the property, Tenancy Services guidance recommends a written request, with landlords required to respond within 21 days under section 42B.
What happens if an adhesive panel pulls off paint when I move out?
Photograph the damage immediately, stop trying to remove further panels in that spot, and tell your landlord what happened. A small touch-up with matching paint often resolves it, and keeping records of your testing and removal process strengthens your position if the landlord tries to claim more than the damage is worth.
What is the difference between damage and fair wear and tear?
Fair wear and tear is the gradual, unavoidable decline from normal living, like faded paint or minor scuffing, which a landlord cannot charge for. Damage is harm beyond reasonable use, such as large holes or paint stripped by an adhesive left on too long, and the Tenancy Tribunal weighs the tenancy’s length and the tenant’s care when deciding which applies.
Can I take my DwellForms™ panels with me when I move?
Yes, that reconfigurability is a core part of the design: panels can be removed carefully and reinstalled in a new home using fresh adhesive pads, following the same removal technique you used the first time. Keeping the original packaging and instructions makes the process at your new place much easier.
Sources
For readers who want to go to the primary material directly:
- Tenants making changes to the property » Tenancy Services
- Tenancy
- Making your rental feel like home: Tenant tips for personalising your space — Property Plus